Coffee is a staple of modern life, and many of us rely on it to help us power through the day. It’s no surprise that when cafes opened their doors back up after the pandemic, queues were long and busy. But the downside of this renewed enthusiasm in coffee culture is that it’s expensive, more so than ever! Coffee shops are not cheap, and if you’re buying a latte daily, then you could be spending a small fortune each month. This is more damaging to your budget than it needs to be.
There is a better way! And it’s a way that will save you money while also helping you enjoy an expertly brewed latte in the comfort of your own home. You can make the perfect latte for yourself, and once you understand the basics, creating this popular beverage is easy and fun.
Latte art may look intricate and complex, but making a latte at home is surprisingly simple. With an espresso machine (or stovetop espresso maker), a simple milk frother, coffee beans, and milk, you can make a knockout coffee right at home. Not an espresso fan (or don’t have the machine for it)? We got you! We’ll tell you how to make the perfect pour-over too!
The Best Homemade Latte
Here’s a step-by-step guide on how you can make the perfect latte at home and never have to queue up at the café again.
1. Ease The Espresso
Espresso is the lifeblood of most coffee drinks, but it can be surprisingly finicky to master. As a rule of thumb, the fresher the beans are, the better the flavor. Invest in a quality espresso machine to easily grind the coffee into a fine powder. Then, tamp it down into a portafilter, so it will extract properly. Once the machine is ready, put the portafilter into the ‘group head’ and start the espresso extraction. The espresso should flow out at a very slow rate (around 25-30 seconds). You should get about 20-30 ml out, which is enough for a single espresso.
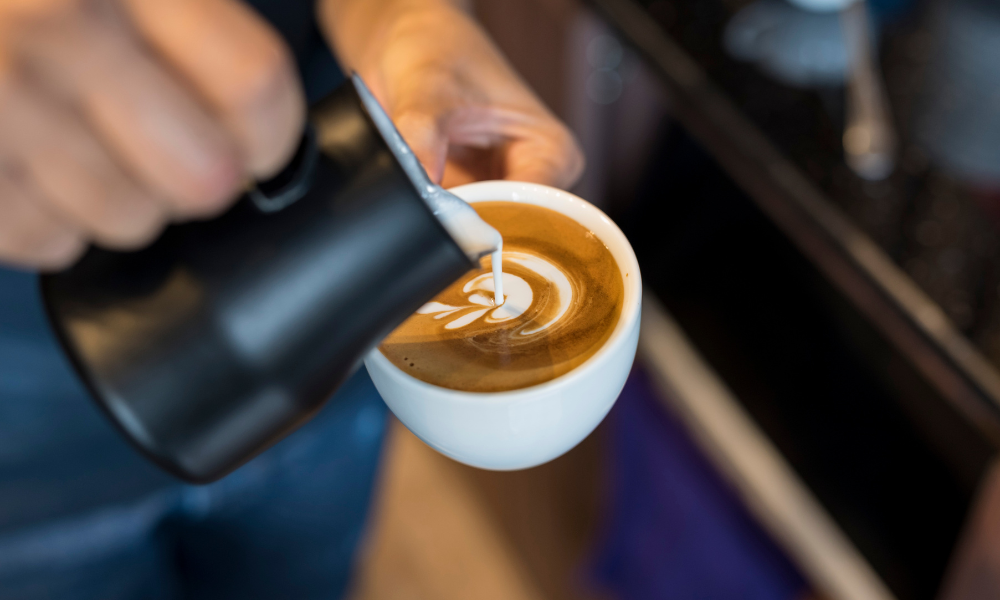
2. Heat The Milk
Take your steamed milk and pour it into a stainless steel pitcher. Hold the pitcher at a low angle, and using a sweeping motion, quickly heat the milk. Keep on whisking the milk until it thickens and boasts a nice foam. The idea is to use the heat to simply create the foam, which you’ll then use for latte art.
3. Combine
Now it’s time to assemble the drink. You should have your espresso soon after the milk is steamed. Pour the espresso into a cup. Take your steamed milk and foam from the pitcher and gently pour it into the espresso.
4. Create Latte Art
Once your latte is all prepared, you can put your new skills to use by making some coffee art. The way you pour the steamed milk will decide the aesthetic outcome. The most basic designs include the world-famous heart and tulip. For a heart, just pour from the pitcher into the center of the cup. As you pour, move your wrist to the left and then to the right in a heart shape motion. For a tulip design, simply press the jug against the cup and move your hand in an up-and-down motion while pouring. If you do it properly the shape should look like a tulip!
5. The Finishing Touches
With the main steps complete, all that is left is to add a sweetener or sprinkle of cinnamon – whatever your preference – and enjoy your latte. With a little practice, you’ll be a master latte maker in no time, and you’ll have saved yourself plenty of money. Plus, you’ll have the satisfaction of knowing that you’ve created a beautiful drink in the comforts of your own home.
The Perfect Pour-over Cup of Joe
Espressos and lattes are the only things we pour money into at coffee shops. The best coffee houses serve artisanal pour-over coffee, and now you can too. Making the perfect pour-over cup of joe requires attention to detail and precision, but with patience, it’s not difficult. Here’s a step-by-step guide on how to do it:
Ingredients and Tools:
- Freshly roasted coffee beans
- Coffee grinder
- Pour-over Coffee Carafe
- Paper filter (unless your carafe has a metal sieve)
- Gooseneck Kettle
- Kitchen Scale
- Timer
- Your Favorite Coffee Mug
- Stirring utensil
- Clean water
Step 1: Prepare Your Equipment
Boil enough water to cover both brewing and rinsing the filter. Let it cool slightly while you move on to the next steps.
Step 2: Measure Coffee
Measure your coffee beans based on the coffee-to-water ratio you prefer. A common ratio is 1:15, meaning 1 gram of coffee to 15 grams of water. Adjust according to your taste preferences.
Step 3: Grind the Coffee
Grind the coffee beans to a medium-coarse consistency, resembling sea salt. The grind size is crucial for proper extraction.
Step 4: Rinse the Filter
Place the filter in the pour-over cone and set it on top of your mug or carafe. Rinse the filter with hot water and preheat the carafe by letting the hot water touch all sides. Discard the rinse water.
Step 5: Add Coffee and Bloom
Add the ground coffee into the rinsed filter. Start the timer and pour just enough water (double the weight of the coffee grounds) to saturate them. Wait around 30 seconds for the coffee to bloom as it emits carbon dioxide.
Step 6: Begin Pouring
After the bloom, start pouring water slowly in a circular motion, evenly saturating the coffee grounds. Start from the center and work your way outward. Maintain a consistent pour rate to avoid over- or under-extraction.
Step 7: Controlled Pouring
Continue pouring in a spiral motion, gradually working your way outwards until you’ve reached the desired weight of water (according to your coffee-to-water ratio). Avoid pouring directly onto the filter to prevent over-extraction at the edges.
Step 8: Allow to Drip
Let the coffee drip through the grounds. Aim for a total brew time of around 2.5 to 3.5 minutes, depending on your taste preferences and grind size.
Step 9: Serve and Enjoy
Once the dripping has slowed down significantly, your pour-over coffee is ready. Remove the pour-over cone, and give the coffee a gentle stir to ensure uniformity. Pour the coffee into your cup and enjoy it while it’s hot!
Remember, achieving the perfect pour-over might take some practice. Factors like grind size, water temperature, pour rate, and even the beans themselves can influence the taste. Adjust these variables to suit your preferences, and don’t hesitate to experiment to find your ideal cup of coffee.
Closing Thoughts
Making the best lattes and perfect pour-overs doesn’t have to be done by a barista. Novice coffee connoisseurs can do it right at home for a fraction of the price. Once you have the right equipment and basics nailed, you’ll be able to make expressos, lattes, and pour-overs in no time. So, get yourself some good coffee and the right equipment and save yourself a hefty monthly bill. You really can have lattes at home that taste just like those at that expensive coffee shop.